The words digital accessibility and PDF documentation don’t go hand in hand. This is due to the fact that PDFs are notoriously difficult to adapt to become inclusive. However, there are some alterations that you can implement to make these documents usable for your readers. This blog talks you through basic PDF accessibility features that you need to be aware of to work to web standards.
Why Adobe Acrobat Pro?
Though there are different Portable Document Format (PDF) programmes out there to create accessible documents, this blog will be focusing on Adobe Acrobat Pro. The reason being, is this version of Acrobat allows you to both view and easily edit the accessibility of your document.
In this document we cover:
- Who benefits from accessible PDF documents
- Why you should avoid having PDF documents on your website
- Important accessibility considerations for online documents
- Key accessibility features in Adobe InDesign
- Providing PDFs with a meaningful title
- Setting the PDF’s language
- How to perform a PDF accessibility check
- How to assess a PDF’s reading order
- Setting alternate text in an Acrobat PDF
- Accessible PDF conclusion and further guidance
Who benefits from PDF accessibility
Creating an accessible PDF means that your content will be universally easy to read and navigate. This is especially the case for website visitors who have a disability and use assistive technology devices or software.
This includes technology such as:
- Screen readers
- Text-to-speech software
- Screen magnifiers
- Speech recognition software and more.
Without accessibility being at the forefront, these users may not be able to access or interact with your content. In fact, by getting into good inclusive habits by structuring and writing content correctly, it will actually enhance the user experience for everyone.
Why you should avoid having PDF documents on your website
In a nutshell, PDF documents are hard to use, search, keep up-to-date, and monitor. Often, PDF documents also aren’t responsive on smaller screens.
Even if a PDF is accessible, users are still forced to navigate away from a website to gain access to information. This can be a time-consuming and frustrating process to simply seek out relevant content they require. We understand that at times it can be unavoidable to have documents within your web page content, however, if the content is important it needs to be within the main body of text. In turn, this will make your platform more usable and strengthen the digital user experience.
Important PDF accessibility considerations for online documents
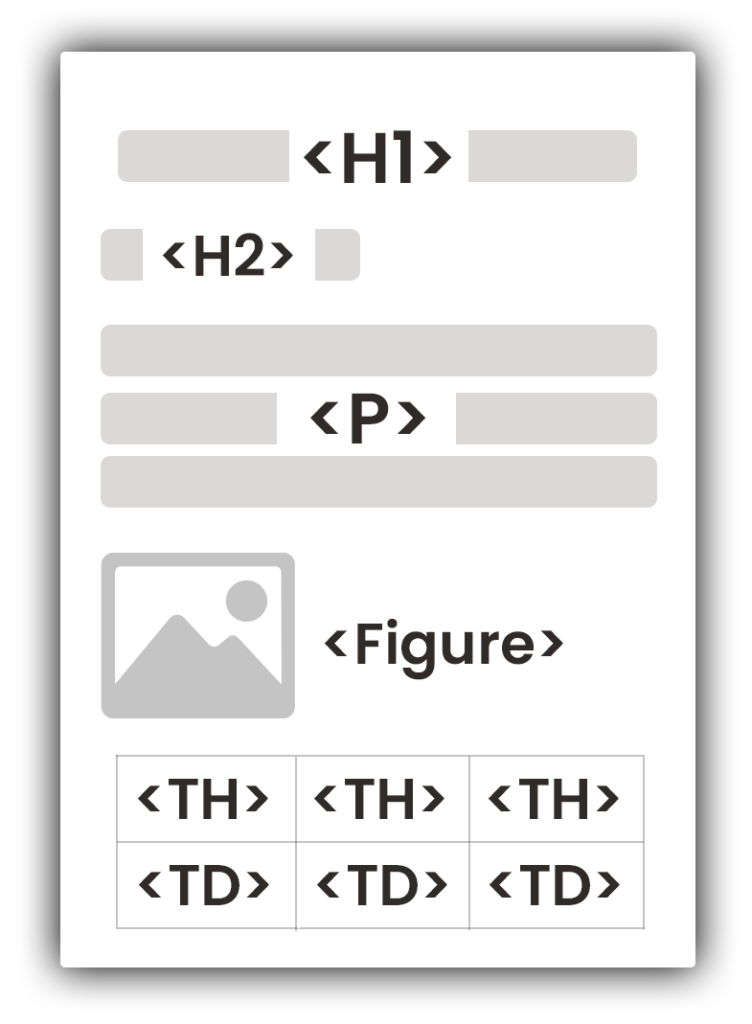
Tagging your content is of the utmost importance when creating a document. Tags should be placed on text, images, graphics, and tables. The good news is, tags have no impact on the visual layout of your documents and they ensure that the PDF’s information is presented to assistive tech users.
Along with other key accessibility considerations, the most crucial aspects when creating accessible PDFs are:
- Implementing a structured hierarchy of heading levels
- Writing and adding effective alternative text (alt text) on imagery
- Providing context through descriptive links and meaningful titles
- Breaking content up with the use of bulleted lists or numbered steps
Setting your document up at the beginning with these features will pull through to a PDF document when converted from the likes of Microsoft Word and Google Docs. These will allow users to quickly skip to these highlighted document elements and understand the presented content. Giving an equal experience for all users.
Further useful accessible document resources

- How to add heading levels in Microsoft Word
- Adding heading levels in Google Docs
- How to add alt text in Word
- How to add alt text in Google Docs
- How to create an accessible table in Word
- Using Word’s accessibility checker
Key accessibility features in Adobe InDesign
Adobe InDesign’s accessibility features can be a little tricky to find. If heading levels and alt text are implemented, like in Word, these will also transfer when converted to a PDF.
Where to find the alt text feature in Adobe InDesign
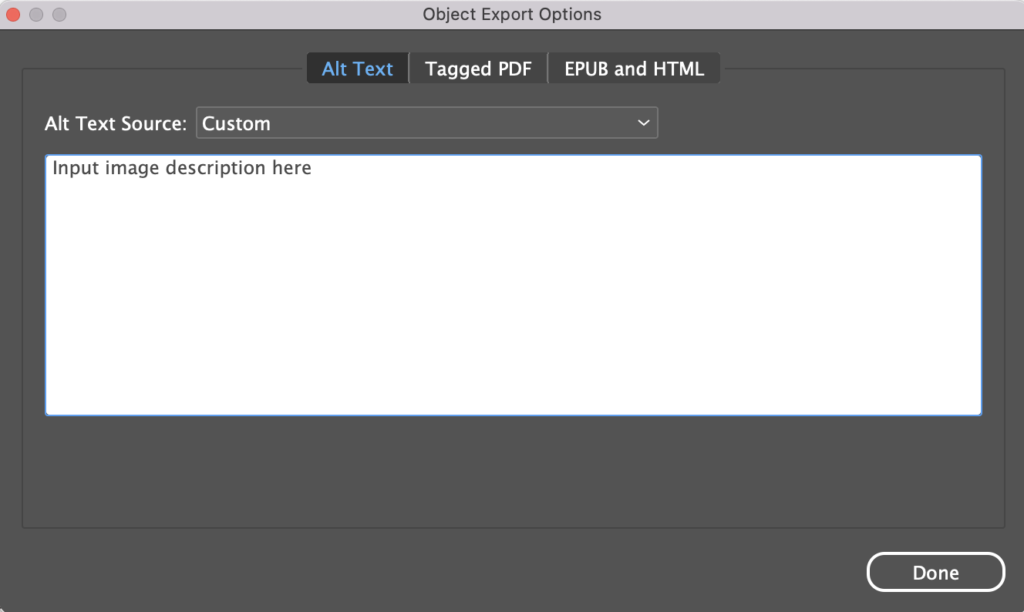
To add alt text in InDesign, you can either right-click on an image or select an image and navigate to the main Object menu. Once there, select the Object Export Options. Make sure that Alt Text is selected and change the Alt Text Source to Custom and input your descriptive image description. Then press done.
How to set heading levels in Adobe InDesign
To transfer your heading levels across to a PDF document, you need to:
- Set them up in the Text Style properties
- Create a new paragraph style, naming it with the relevant heading level, such as H1.
- Style this heading as you wish in the ‘Basic Character Formats’ menu.
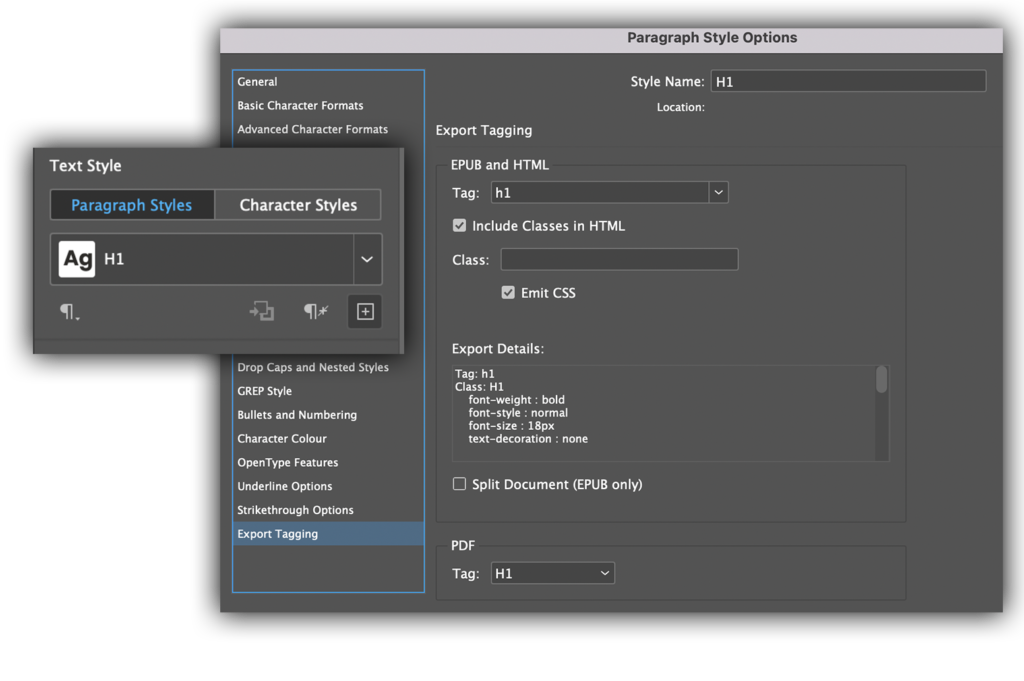
One important factor to remember is on each paragraph style to also set the ‘Export Tagging’ tag option to the corresponding heading levels. These will then be transferred when exported into a PDF.
The importance of giving PDFs a meaningful title
To meet Web Content Accessibility Guidelines (WCAG) Success Criterion 2.4.2 (Page Titled), you must give your PDF document a meaningful document title. This will help assistive tech users know where they have navigated to from your website.
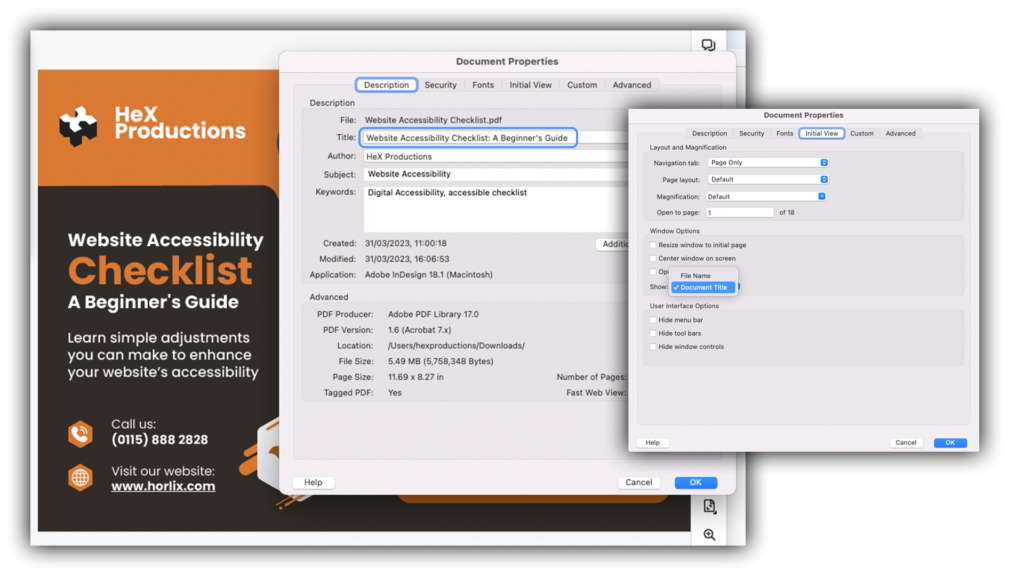
To do so:
- Choose File, Properties, and select Description.
- Enter a title in the Title text box.
- Click Initial View and then choose Document Title from the Show drop-down list.
- Then select OK.
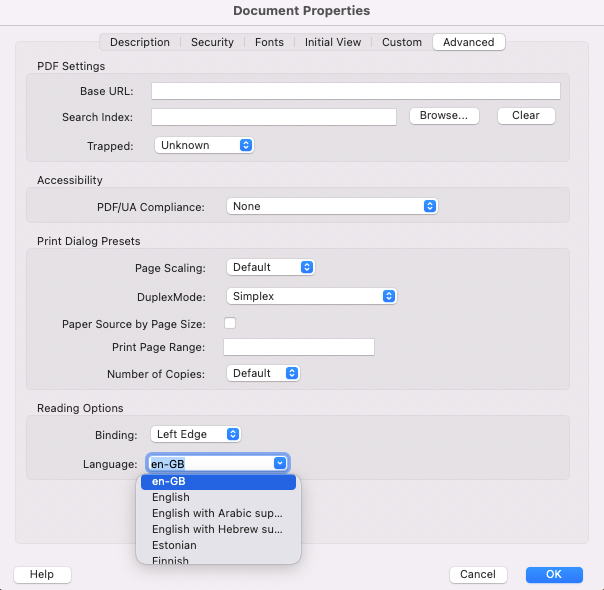
Setting the PDF’s language
Setting the PDF language assists screen reader users by ensuring content is read out in the intended language.
To set the PDF language, choose File, Properties, Advanced and then select a language from the drop-down list in the Reading Options section.
How to perform a PDF accessibility check
Even if you’ve undertaken an accessibility check within Word, it’s still vital that you run one in Acrobat. This is likely to pick up more errors and show you what needs addressing.
One thing to note is, this will only work on text-based documents, not documents which have been scanned in.
To start an accessibility check:
- Visit the All Tools section in Acrobat.
- Choose the Prepare for Accessibility option.
- Select Accessibility Check.
- Make sure all options are selected.
- Start Checking the document.
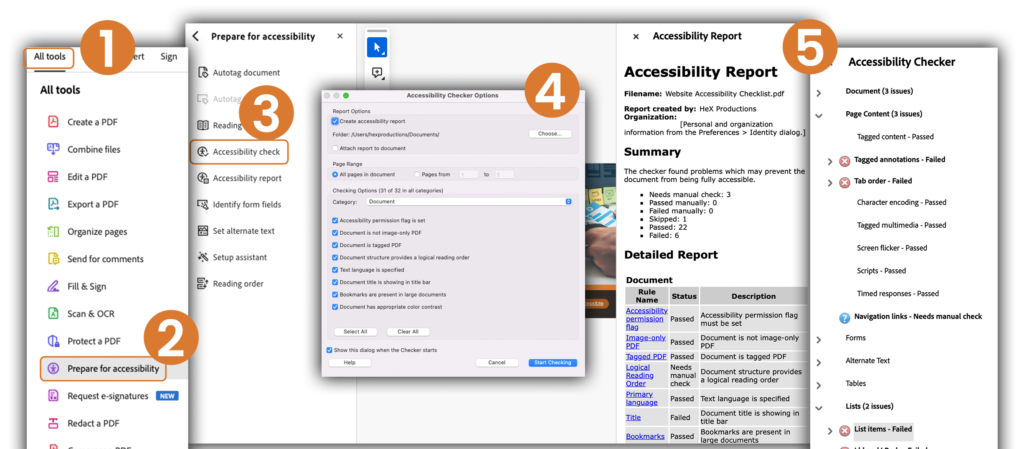
On the right-hand side of the PDF it will bring up which areas have passed or failed the check or need a manual review. Issues will be highlighted in bold. Selecting the dropdown menu next to each error, will lead you to links within the document that need to be amended. You can right-click on each error, which gives options to get further details on each, to skip the rule, or recheck once altered.
You can also access a more detailed Accessibility Report, which can be found in the left hand menu. In this report, you can select links which provide a detailed guide on each point on how to rectify the accessibility errors.
How to assess a PDF’s reading order
An important aspect when creating accessible PDFs is ensuring the reading order is in a logical structure. This should be in the same order as the visual document is presented. Ensure that all content is read in the correct, intended order so it makes sense for users of assistive technology.
The Reading Order feature is also located in the main accessibility menu. By selecting the Show Order Panel, your pages will be presented with drop down menus showing the order that the page is read in. If the order is not presented correctly, these can be dragged and dropped into the right order using the left mouse button.
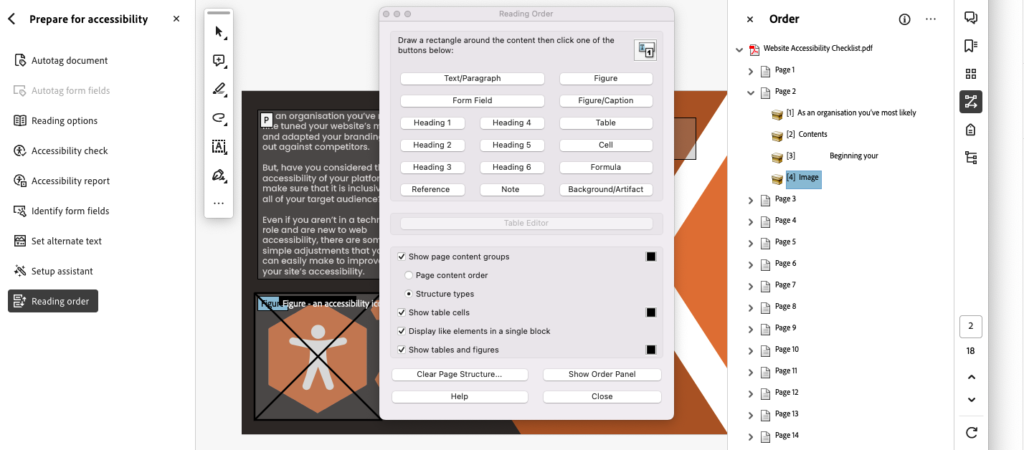
By right-clicking over the reading order elements, you can also swiftly change incorrect blocks to tag areas as paragraphs, headings, tables etc. If some sections are missing, such as the correct heading levels, you can delete that area and reenter the information using the selector tool. Areas can be deleted either by selecting the relevant reading order item and pressing the delete key or by right clicking and selecting the Delete Selected Item Structure.
To add items to the reading order:
- Reselect the Reading Order tab in the accessibility menu.
- Use the selector tool by drawing a rectangle around the missing area.
- Select the relevant option, such as Heading level 2 or paragraph.
Setting alternate text in an Acrobat PDF
If alt text hasn’t been added to your document before converting from other software, you can find a Set Alternate Text option in the accessibility menu. This will allow you to use arrows to scroll through all images found in the document and add in the image description.
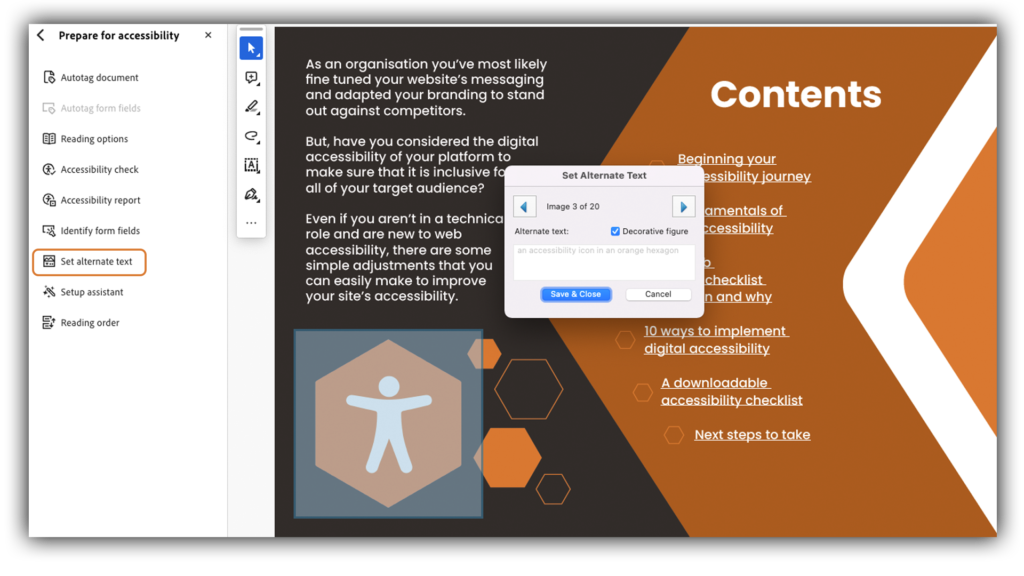
An option found here is also the Decorative Figure feature. This should be used on images, such as icons, that provide no useful context for screen reader users. In turn, this will allow users to bypass this information. If you are within the Reading order panel, you can also tag these items as a background/artifact for the same purpose.
PDF Accessibility Conclusion
These are just a few basic steps that you can take to ensure PDF accessibility which means your document is accessible to all. This being said, we’d still advise you to steer away from the use of PDFs where possible online. Instead, integrate important information into your web page content to assist your users.
Whilst checking your documents, why not take this opportunity to experience how a screen reader user navigates digital documents. Nowadays, most browsers, software, and even your mobile phone have screen readers built into them, so this is a prime opportunity to assess how your documents would be read aloud to your website visitors. This will give you a first-hand insight into why it’s vital to make these accessibility checks on documents and platform content.
If you require help with creating accessible content, we offer face-to-face or online Content Editor Accessibility Training.
Further detailed PDF guidance
- PDF techniques for Web Content Accessibility Guidelines (WCAG)
- Create and verify PDF accessibility (Acrobat Pro)
